Help Center
Quick Start
- Overview
- System requirements
- Minimum privileges required
- Default port configuration
- Installing DataSecurity Plus
- Uninstalling DataSecurity Plus
- Starting DataSecurity Plus
- Launching DataSecurity Plus
- Configuring your solution
- Licensing details
- Applying a license
File Auditing
- About File Auditing
- Domain configuration
- File server configuration
- Failover cluster configuration
- NetApp server configuration
- Workgroup configuration
Setting up File Audit
Dashboard
Reports
Alerts
Configuration
Storage Configuration
File Analysis
- About File Analysis
Setting up File Analysis
Dashboard
Reports
Alerts
Configuration
Data Risk Assessment
- About Data risk assessment
Setting up Data risk assessment
Dashboard
Reports
Ownership analysis
Configuration
Endpoint DLP
- About Endpoint DLP
Setting up Endpoint DLP
Reports
Alerts
Prevention policies
Configuration
Cloud Protection
- About Cloud Protection
- Gateway Server Configuration
- Certificate Authority Configuration
- Gateway Configuration in Endpoint
- Manage Certificate Trust Store
- Threat Analytics Database
- Manage Banned Applications
- Manage Authorized Applications
- Gateway Server Failover
- Two-way SSL configuration
- Global Insight
- Application Insight
- User Insight
- Shadow Application Insight
- Banned Application Insight
- Cloud Access Reports
- Application Insights
- Shadow Cloud Application Reports
- Banned Cloud Application Reports
- File Upload Reports
- Cloud App Discovery
Setting up Cloud Protection
Dashboard
Reports
Storage Configuration
Administrative settings
- Technician configuration
- Notification filters
- Manage agent
- Agent settings
- SIEM integration
- Business hours configuration
- Two-factor authentication
- Workgroup configuration
- Security policy
Email configuration
General settings
- Connection
- Personalize
- DataSecurity Plus Server
- Privacy Settings
- Disk utilization
- Schedule Retention Policy
Policy Configuration
Release notes
2024
2023
2022
2021
2020
2019
2018
2017
2016
2015
Troubleshooting
- HTTP communication failure
- Dormant DataEngine
- Secure Gateway server failure
- RPC communication failure
- Known issues and limitations
- Known errors and solutions
Guides
- Agent document
- How to Migrate/Move DataSecurity Plus
- How to apply SSL certificate
- How to automate DataSecurity Plus database backup
- How to set alerts in DataSecurity Plus
Policy configuration
The Policy Configuration provision in the Administrative Settings page allows users to enable, configure, and customize policies. Policies are made up of policy profiles which can be customized in your DataSecurity Plus solution to secure your organization's sensitive data. This requires a two-level configuration to set up:
Step 1: Create a Policy profile: Policy profiles enable users to manage individual aspects of data security, such as identifying sensitive data and managing cloud applications. DataSecurity Plus comes with a set of built-in policy profiles and users can customize new profiles per their requirements.
Step 2: Create a policy and add policy profiles to it: Add default or custom policy profiles to a policy to activate them and apply them to managed entities.
Policy profiles
To view and edit a policy profile:
Viewing and editing policy profiles
- Navigate to the Policies page (Admin Console > Admin > Policy Configuration > Policies).
- Click Policy Profiles.
- On the Policy Profiles page, you will find a list of configured policy profiles.
- Choose the policy profile you'd like to edit, and click the Edit icon.
- On the Edit "policy profile" page, view and edit the policy profile's existing configuration.
- Click Save.
Creating policy profiles
To configure a policy profile:
- Navigate to the Policies page (Admin Console > Admin > Policy Configuration > Policies).
- Click Policy Profiles.
- On the Policy Profiles page, you will find a list of prebuilt profiles. Click the +Add New Policy Profile button, and choose the category you want to configure.
- On the Add New Profile page, enter the Profile Name, Profile Description.
- Configure the criteria. The criteria will vary based on the chosen category. Refer to the Policy profile categories section for detailed information on the criteria available in each category.
- Click Save.
Ensure that you map your policy profile to a policy to activate it.
Default policy profiles cannot be edited. However, users can create and edit copies of default policy profiles by following these steps:
- Navigate to the Policies page (Admin Console > Admin > Policy Configuration > Policies).
- Click Policy Profiles.
- On the Policy Profiles page, you will find a list of prebuilt profiles. Choose a prebuilt profile and click the Edit icon.
- On the Edit "policy profile" page, find the prompt with the duplicate link at top of the page and click the link.
This will create an editable copy of the existing policy profile.
Policy profile categories
Policy profiles can be classified into various categories. The layout and functionality of a policy profile will vary based on its category. Currently, users can classify policy profiles into the Cloud DLP category.
Cloud DLP category
The Cloud DLP category helps administrators manage the use of cloud applications. Administrators can classify cloud applications, prevent file upload, respond to cloud requests, and perform various other actions. Follow these steps to configure a policy profile in the Cloud DLP category:
- Navigate to the Add New Profile page (Admin Console > Admin > Policy Configuration > Policies > Policy Profiles > Add New Policy Profile page).
- Enter a suitable Profile Name and Profile Description.
- Assign a Tag. Tags can be used to group policy profiles based on their functionality.
- Select a Filter. The two types of filters are:
- Predefined Filter: Enables users to select a DLP Type and choose from a plethora of preconfigured applications. The DLP Type selected determines the actions that will be performed to the chosen cloud applications. Currently, users can select Block File Upload.
- Custom Filter: Enables users to enter a filter processing stage, define criteria, and choose a response action. Criteria can be configured based on various parameters. Refer to the table below for the list of parameters:
- Click Save.
For example, to prevent users from uploading files to Google Drive, you must choose the following DLP Type and cloud application:
DLP Type = Block File Upload
Cloud Application = Google Drive
| Parameter | Description |
| Domain | Provide the domain names such as spotify.com. |
| Request URI | Provide the complete request URI such as https://instagram.com/feed.html#profile, or the path. |
| Request Method | Provide request methods, such as GET, POST, PUT and other methods. |
| Request Headers Content Type | Provide request headers content type such as application/json or other content types. |
| Request Referrer | Provide request referrers such as https://www.netflix.com/browse |
| Request Headers | Provide custom request headers such as Content-Length, User Agent and other headers. |
| Response Code | Provide response codes such as 200, 204, 301 or other status codes. |
| Response Headers | Provide custom response headers such as Content Type and Content Length. |
Note: Users can choose to apply the filters at either of these processing stages:
Request: The filters will be processed before the request is sent to original server.
Response: The filters will be processed before the response from original server is sent to the client.
Users can choose to configure criteria based on one or multiple parameters as mentioned above. To configure criteria based on multiple parameters, the user must define the Condition Type. Refer to the examples below for an understanding of how you can define the Condition Type and configure a custom filter.
For example, to prevent employees from deleting files on OneDrive, you must set:
Condition Type: All Conditions
Domain: api.onedrive.com
Request Method: DELETE
Action: Block
Similarly, to prevent employees from using meta.com or instagram.com:
Condition Type: Any Condition
Domain: meta.com
Domain: instagram.com
Action: Block
Advanced condition:
Advanced conditions are handy when you need a combination of AND and OR conditions. In such instances, users have the choice to configure custom criteria patterns.
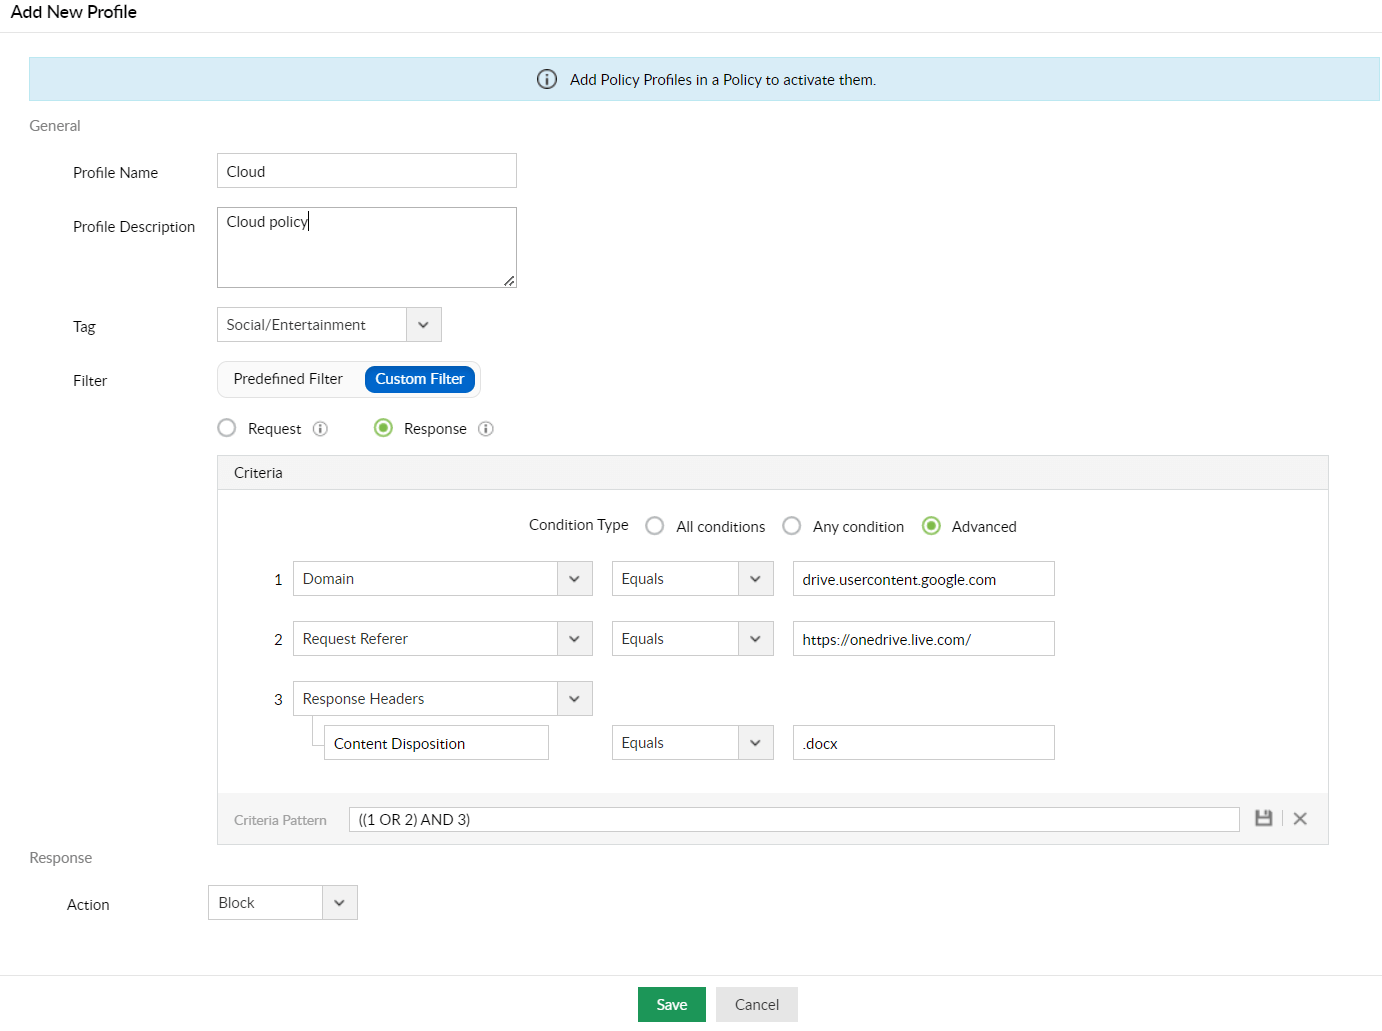
Example: To prevent employees from downloading DOCX files on Google Drive and OneDrive:
Condition Type: Advanced
Domain: drive.usercontent.google.com
Request Referrer: https://onedrive.live.com/
Response headers: Content disposition = .docx
Criteria Pattern: ((1 OR 2) AND 3)
Action: Block
Policies
Viewing and editing policies
You can view and edit policies by following these steps:
- Navigate to the Policies page (Admin Console > Admin > Policy Configuration > Policies).
- On the Policies page, you will find the list of configured policies.
- Choose the policy you'd like to edit, and click the Edit icon to edit the configuration.
- On the Edit "Policy" page, make the necessary changes to the policy's existing configuration.
- Click Save.
Creating new policies
You can create policies by following these steps:
- Navigate to the Policies page (Admin Console > Admin > Policy Configuration > Policies).
- Click the +Add Policy button.
- On the Add New Policy page, enter a suitable Policy Name and Policy Description.
- Choose Policy Profiles. Currently, users can make use of the policy profiles in the Cloud DLP category.
- Click Save.
Default policies cannot be edited. However, users can create and edit copies of default policies by following these steps:
- Navigate to the Policies page (Admin Console > Admin > Policy Configuration > Policies).
- On the Policies page, you will find a list of prebuilt policies. Choose a prebuilt policy and click the Edit icon.
- On the Edit "policy" page, find the prompt at the top of the page with the duplicate link and click the link.
This will create an editable copy of the existing policy.