Managing Customized Database Resource Types and Resources
Password Manager Pro supports managing certain resource types by default and allows you to add new resource types as required. In addition to that, you can also create and configure new database resource types with a customized set of database attributes. Doing so will allow you to add the uniquely configured MS SQL Server, MySQL Server, PostgreSQL, Oracle DB Server, or Sybase ASE databases in your organization as the new resources in Password Manager Pro. With this, you will gain the flexibility to perform password resets, password verifications, account discovery, and SQL auto logon session processes for the uniquely configured databases, tailored to your specific needs, precisely empowering the organization to align database resources in Password Manager Pro on a required basis.
Notes: The attributes of the default database resource types cannot be edited. To manage your uniquely configured database via Password Manager Pro, follow these steps:
- Create a new database resource type.
- Utilize default database templates as required with customized attributes and create a new database resource type.
- Manually add the database that meets the attributes of the newly added resource type as a resource within Password Manager Pro.
- Perform various actions over the database resource seamlessly.
This document will help you learn various processes involved in creating and managing custom database resources via Password Manager Pro.
- Role - Managing Customized Database Resources
- Creating the JDBC Properties
- Creating a Customized Database Resource Type
- Editing the Customized Database Resource Type at Resource Level
- Editing the Customized Database Resource Types in Bulk
1. Role - Managing Customized Database Resources
Users with Privileged Administrator and Administrator roles can manage customized database resource types and can manage JDBC properties in Password Manager Pro by default. To grant this responsibility to other users, you can create a custom role with Manage JDBC Properties, Configure Custom Database Connections, and Manage Custom Database Connections privileges enabled.
- Manage JDBC Properties - Allow users to manage the JDBC properties.
- Configure Custom Database Connections - Allow users to create, edit, and manage new database resource types with customized database attributes.
- Manage Custom Database Connections - Allow users to create, edit, and manage new database resource types with the customized database attributes and to approve/decline the new resource type request.
Users assigned with the above privileges can configure and manage customized database resource types and manage JDBC properties accordingly via Password Manager Pro.
2. Creating the JDBC Properties
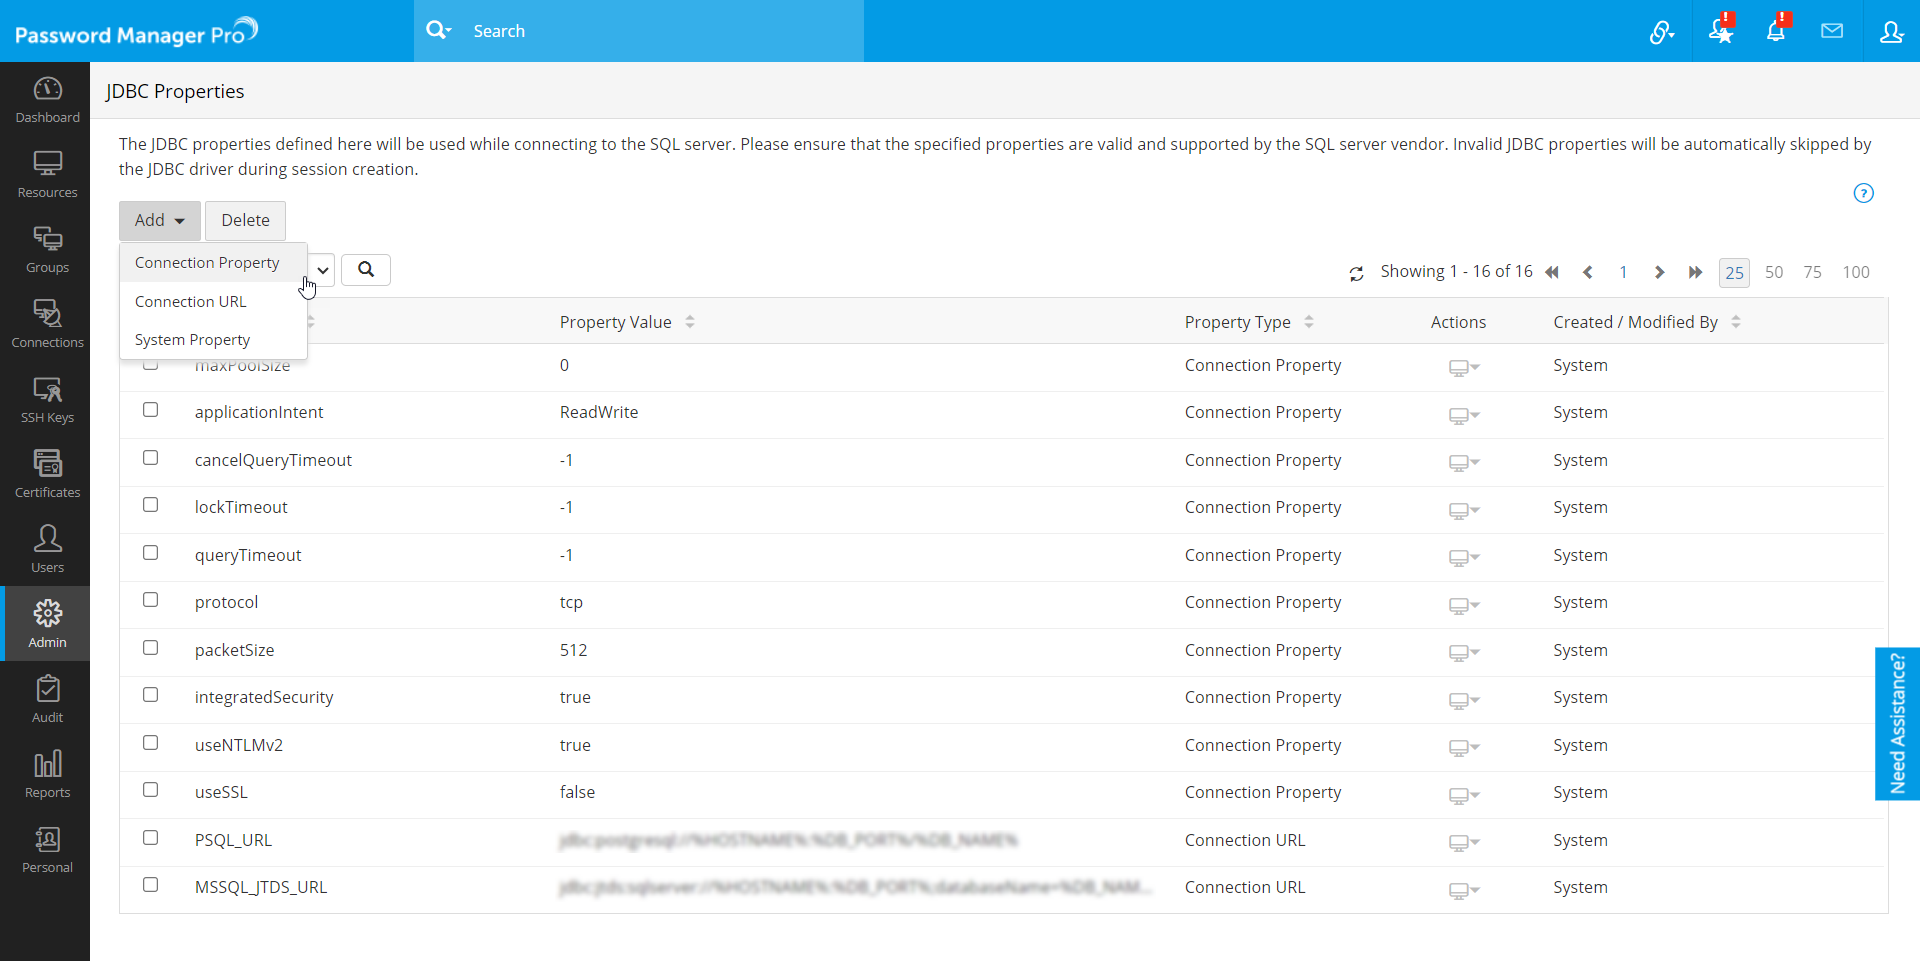
By default, Password Manager Pro provides several JDBC properties that supports connecting with the SQL server. To add new JDBC properties for your database resource type,
- Navigate to Admin >> Resource Config >> JDBC Properties.
- Click Add and select the JDBC property to be added i.e Connection Property/Connection URL/System Property.
- Enter the Property Key and Property Value, and click Save to add the new JDBC property.
Note: Users can also open the JDBC Properties page from the database resource type creation page by clicking the View JDBC Properties link which will be present at the top-right corner.
3. Creating a Customized Database Resource Type
To create a custom database resource type,
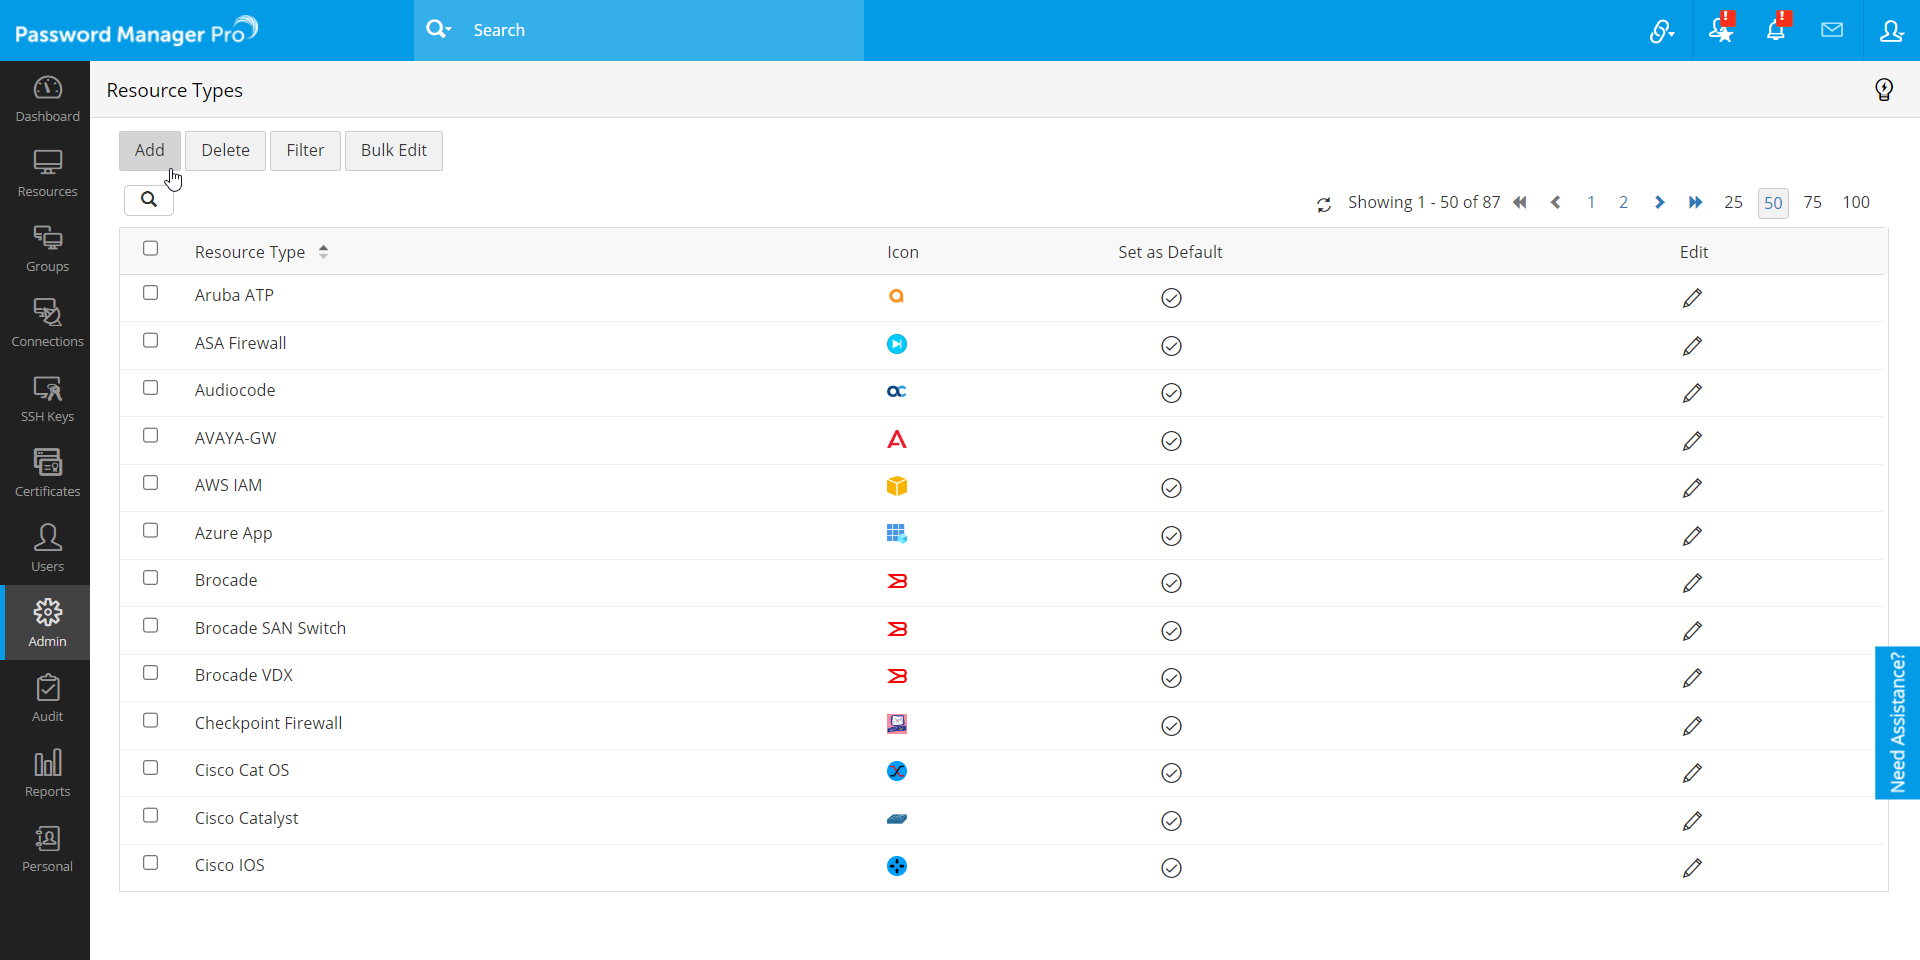
- Navigate to Admin >> Resource Config >> Resource Types.
- Click Add to add a new resource type.
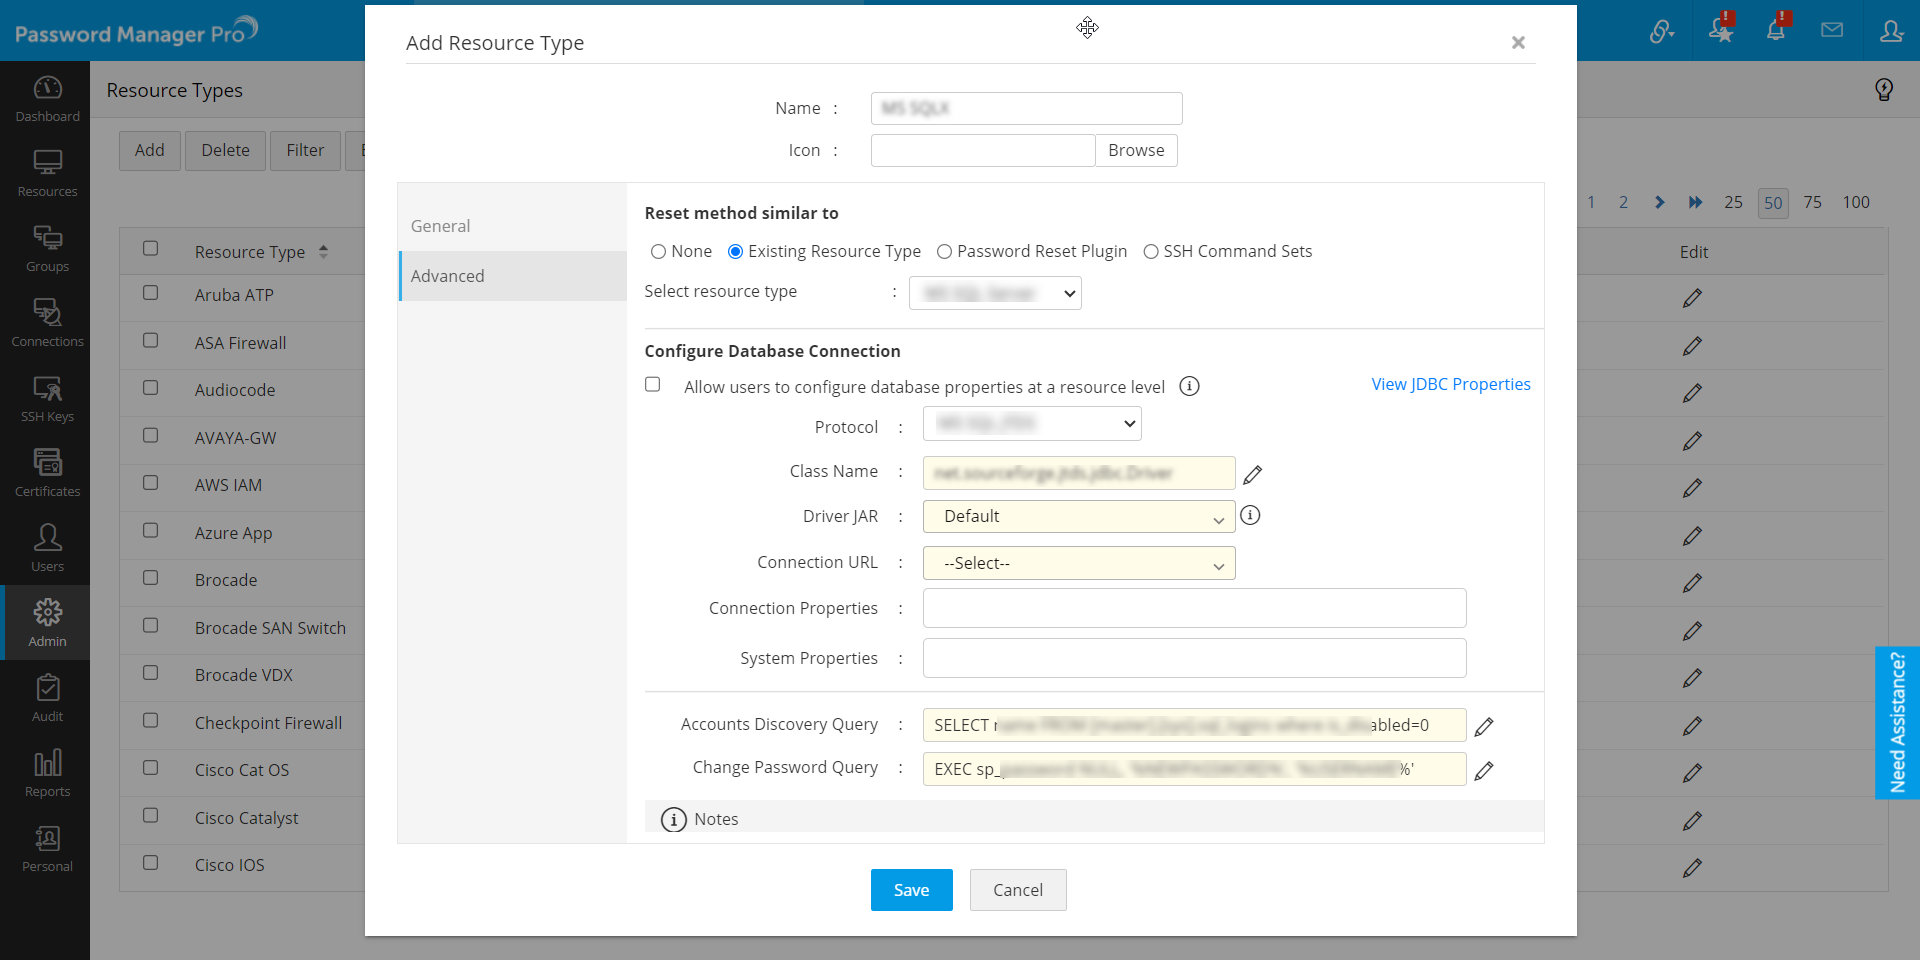
- Enter the Name of the new resource type and provide it an Icon as desired.
- From the General tab, select the Resource Attributes and Account Attributes as required for the new resource.
- Click the Advanced tab, select the Existing Resource Type radio button, and select the existing database resource type to use it as a template for the new database resource type attributes.
- Next, configure the database connection details as per your requirement in the following fields:
- Protocol: This field will be available when you select only MS SQL Server as your template for your new database resource type. Select either MS SQL JTDS or MS SQL JDBC from the dropdown.
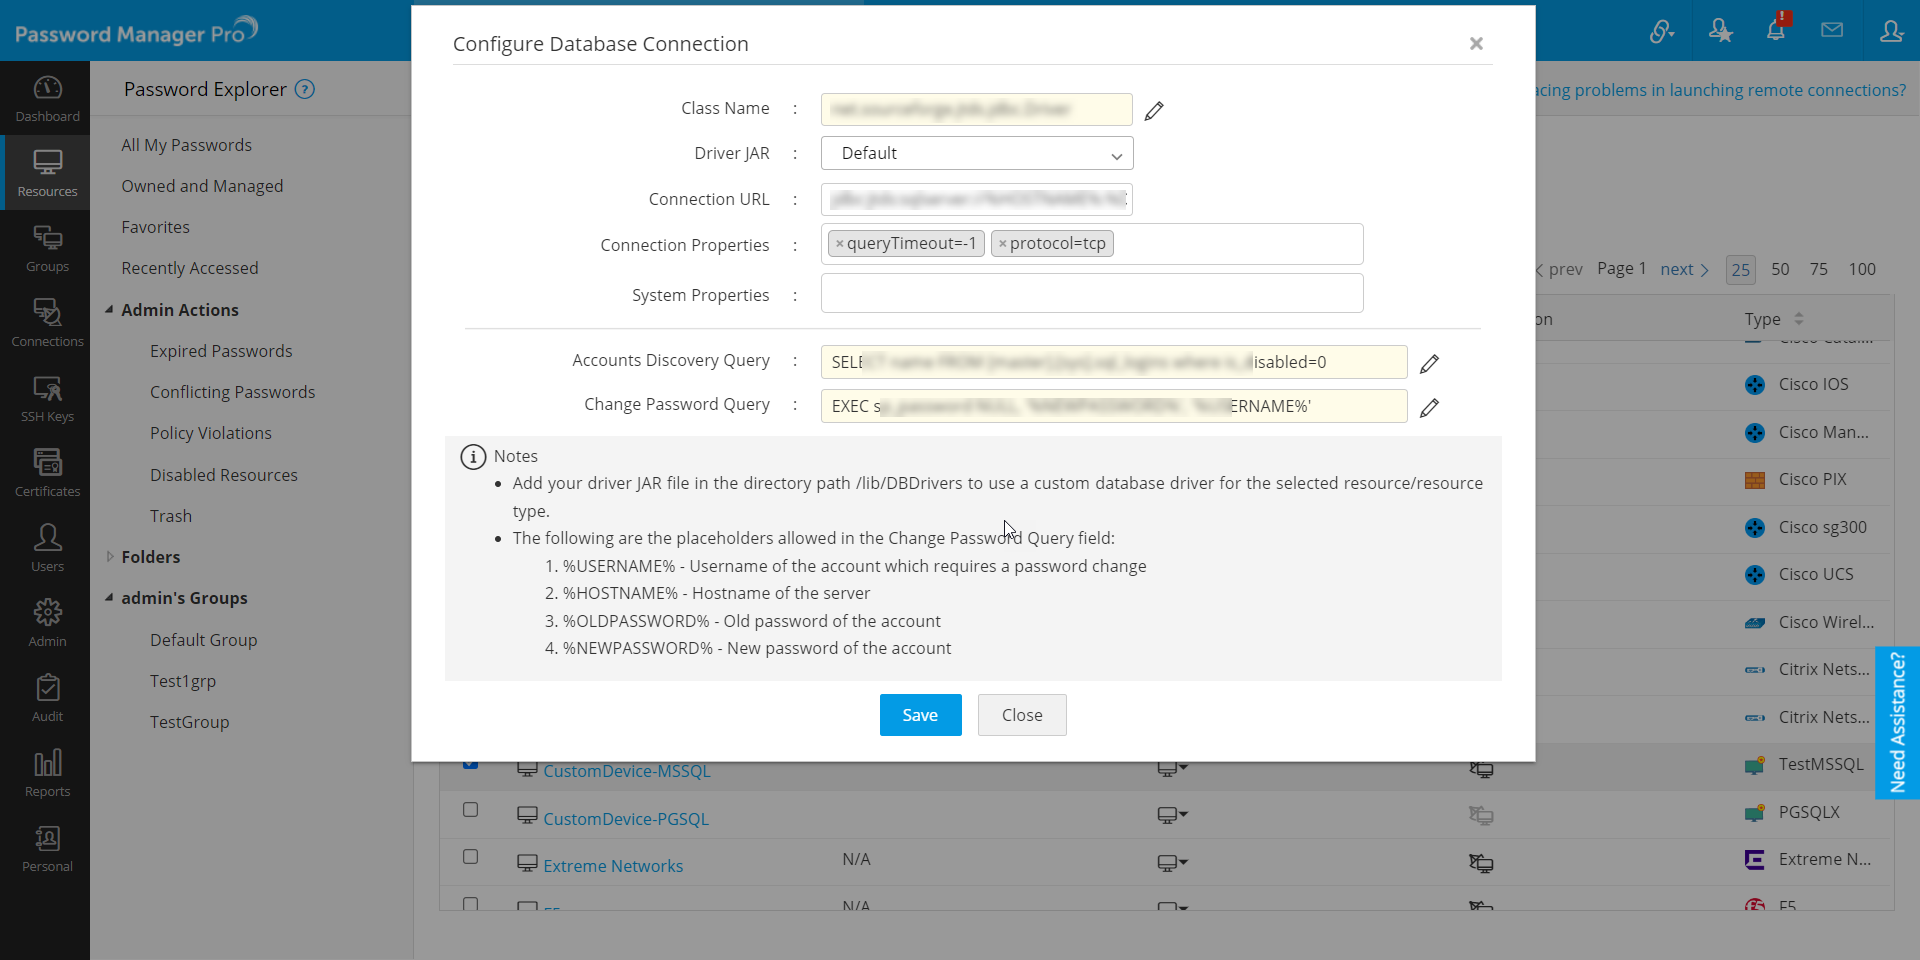
- Class Name: Enter the Java class name used to make the JDBC connection. This driver class name will be available inside the driver JAR file provided by the SQL vendor.
- Driver JAR: Select the driver JAR file present inside the <PMP_Installation_Folder>/Lib/DBDrivers directory. The driver JAR file must be loaded manually into the Password Manager Pro server to establish the JDBC connection.
- Connection URL: Select the connection URL from the dropdown to establish a connection to the specific database.
- Connection Properties: Choose the default property values from the dropdown or enter the key-value pairs to add them to the configuration details.
- System Properties: Enter the JDBC system properties in this field. These properties will be used to establish the connection to the SQL server. Upon closing the session, the system properties will be reset.
- Accounts Discovery Query: Click the edit icon beside this field to change the default account discovery query. Here, enter the SQL query needed to fetch the list of user accounts available in the SQL server.
- Change Password Query: Click the edit icon beside this field to modify the default change password query. Here, enter the SQL query needed to modify the password of a user account in the SQL server.
- Enabling the 'Allow users to configure database properties at a resource level' checkbox will allow resource owners and users with Full Access permission to modify the attributes of the database resources created under this new resource type.
- Download and move the MongoDB driver JAR file to the Password Manager Pro directory.
- On the Add Resource Type page, select the existing 'PostgreSQL' resource type template and input the following:
- Class Name: mongodb.jdbc.MongoDriver
- Driver JAR: Select the downloaded driver JAR
- Connection URL: jdbc:mongodb://%HOSTNAME%:%DB_PORT%/%DB_NAME%
- Accounts Discovery Query: db.system.users.find()
- Change Password Query: db.system.users.update({ "user": "%USERNAME%" }, { $set: { "pwd": "%NEWPASSWORD%" }})
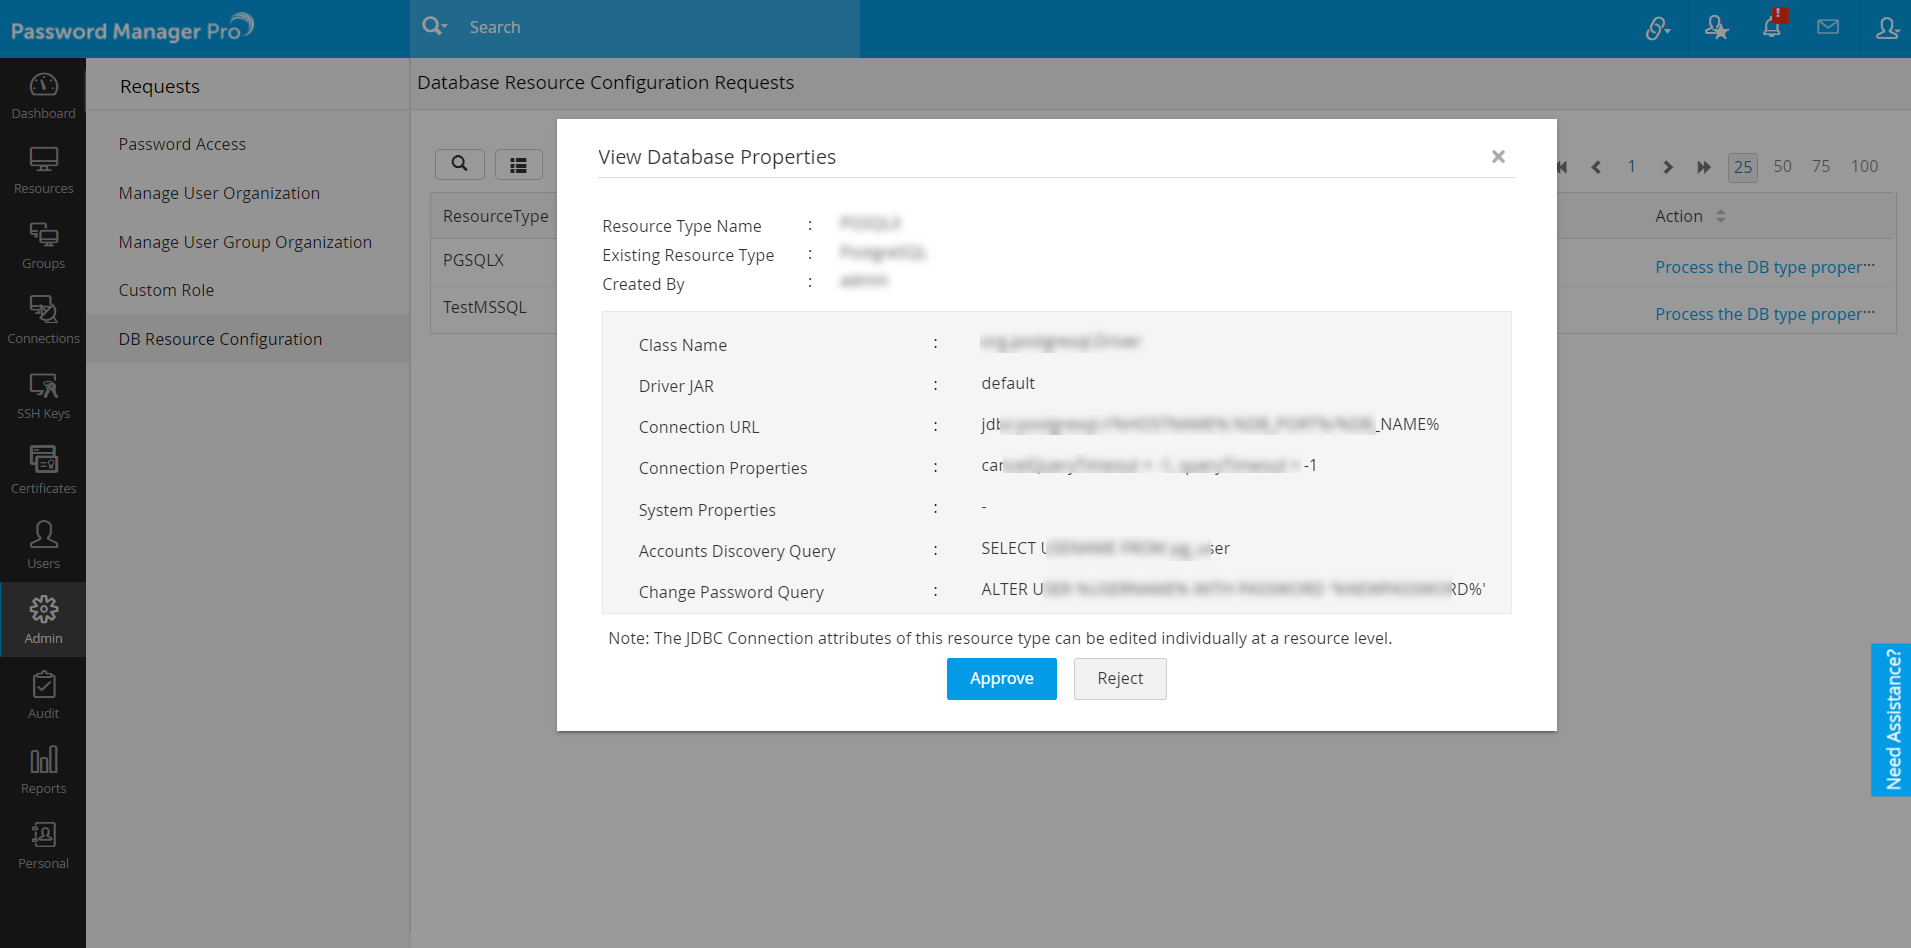
- Upon saving the new resource type, an approval request will be sent to the users (administrators/privileged administrators/custom users) who have the Manage Custom Database Connections privilege.
Note: Please exercise caution while validating all the configured values for the database connection. Misconfigured values may lead to SQL Injection and other security breaches.
For example, if your desired SQL server is NoSQL server such as MongoDB, select an SQL server from the dropdown and proceed with the configuration:
Input connection and system properties as needed and click Save.
Note: The approval is required for adding or changing the custom database resource type attributes, not for editing or managing customized database resources at resource level in Password Manager Pro.
Note: The resource type addition request can be approved by navigating to Admin >> Access Review >> DB Resource Configuration Request or directly from the notification list at the top pane of the user interface.
4. Editing the Customized Database Resource Type at Resource Level
To edit the customized database resource that you have created via a new resource type, do the following steps:
- Navigate to the Resources tab.
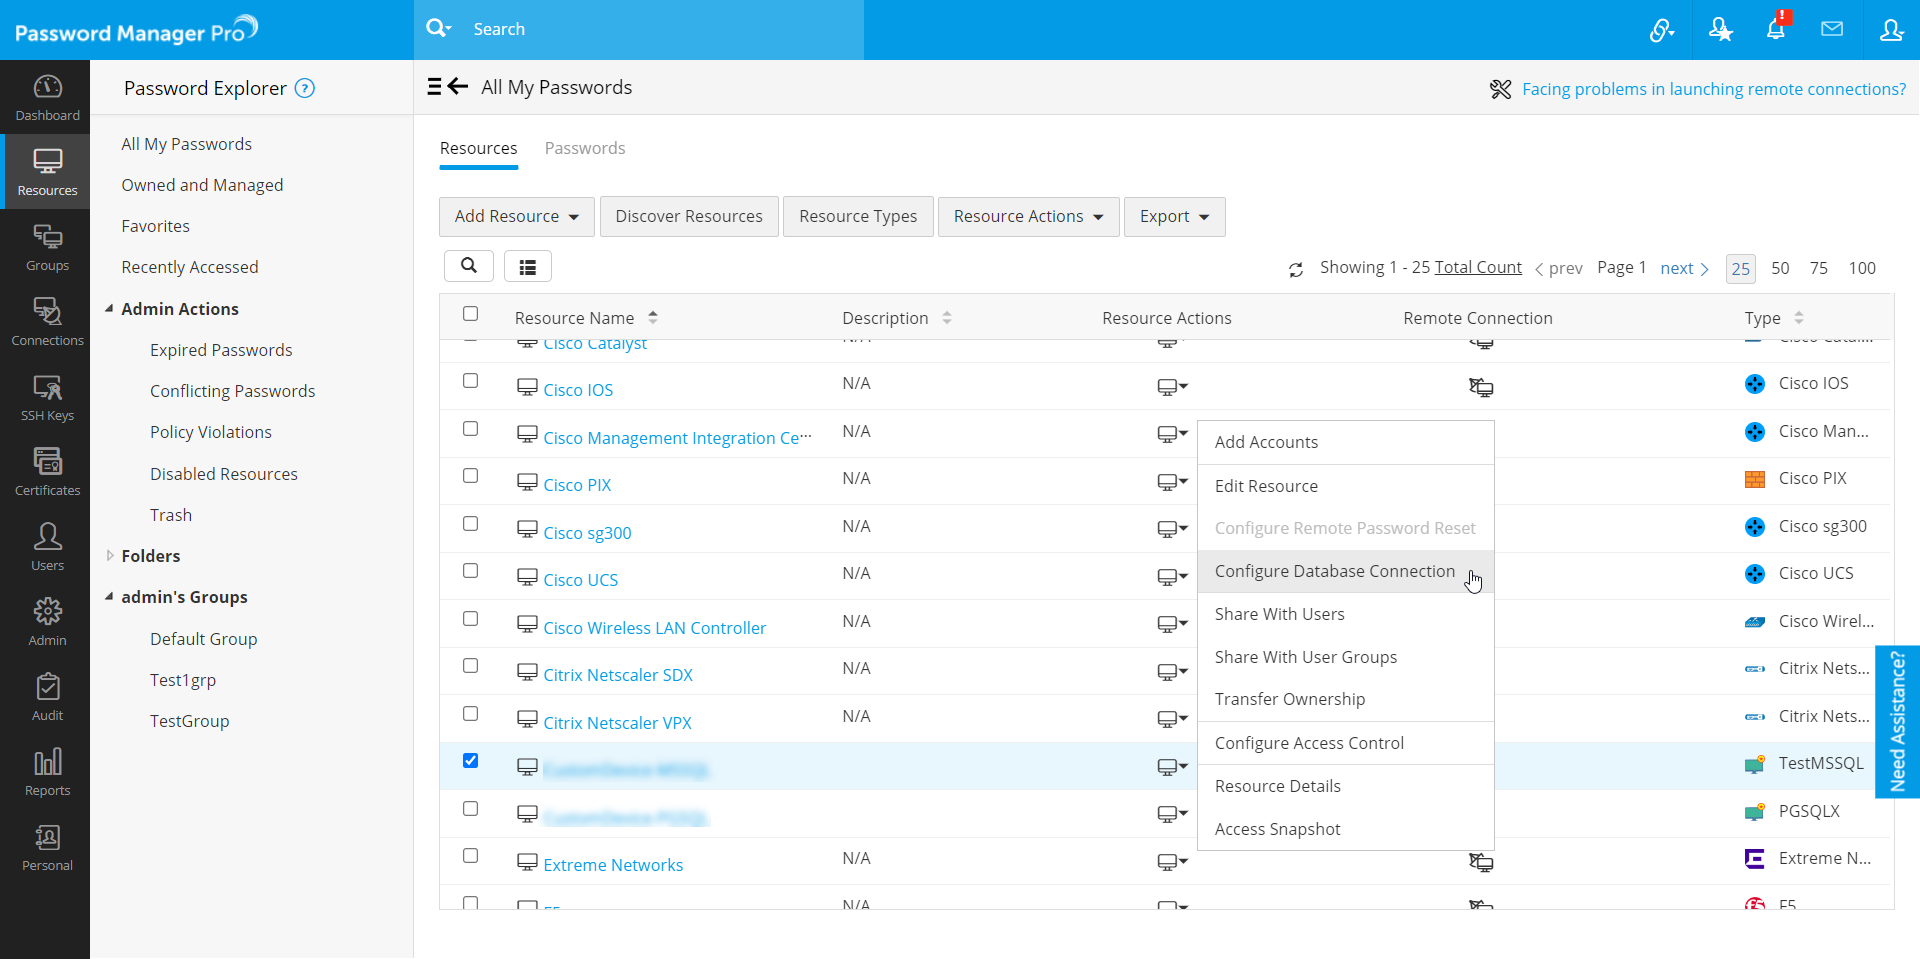
- Click the Resource Actions icon beside the respective customized database resource that you want to edit and select the Configure Database Connection option.
- In the dialog box that opens, modify the relevant field as required and click Save.
Note: The resources created using the default database resource types cannot be edited.
5. Editing Customized Database Resource Types in Bulk
While creating a new customized database resource type, you can select any of the available default database resource types as the template. If you have created many new resource types with diverse existing database templates, you can also edit them in bulk at the resource level as required. To do so,
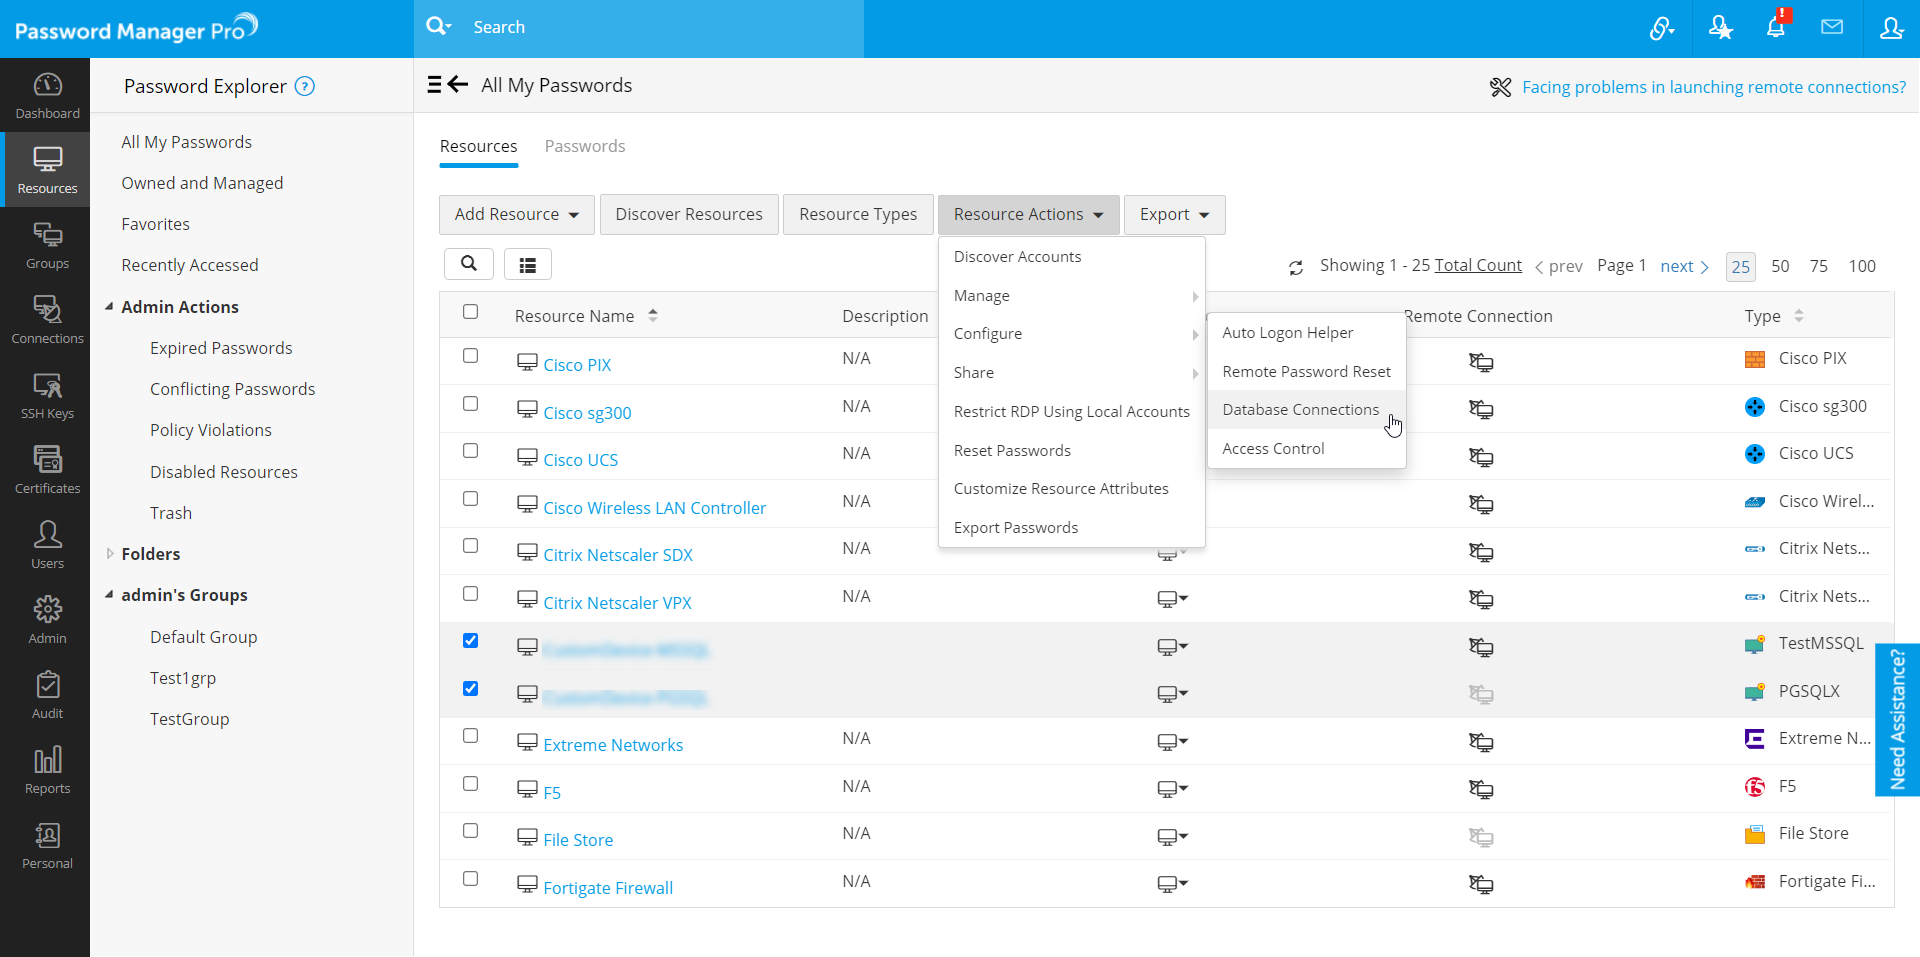
- Navigate to the Resources tab and select the customized database resource from the list of resources.
- Click the Resource Actions button and select Configure >> Database Connections.
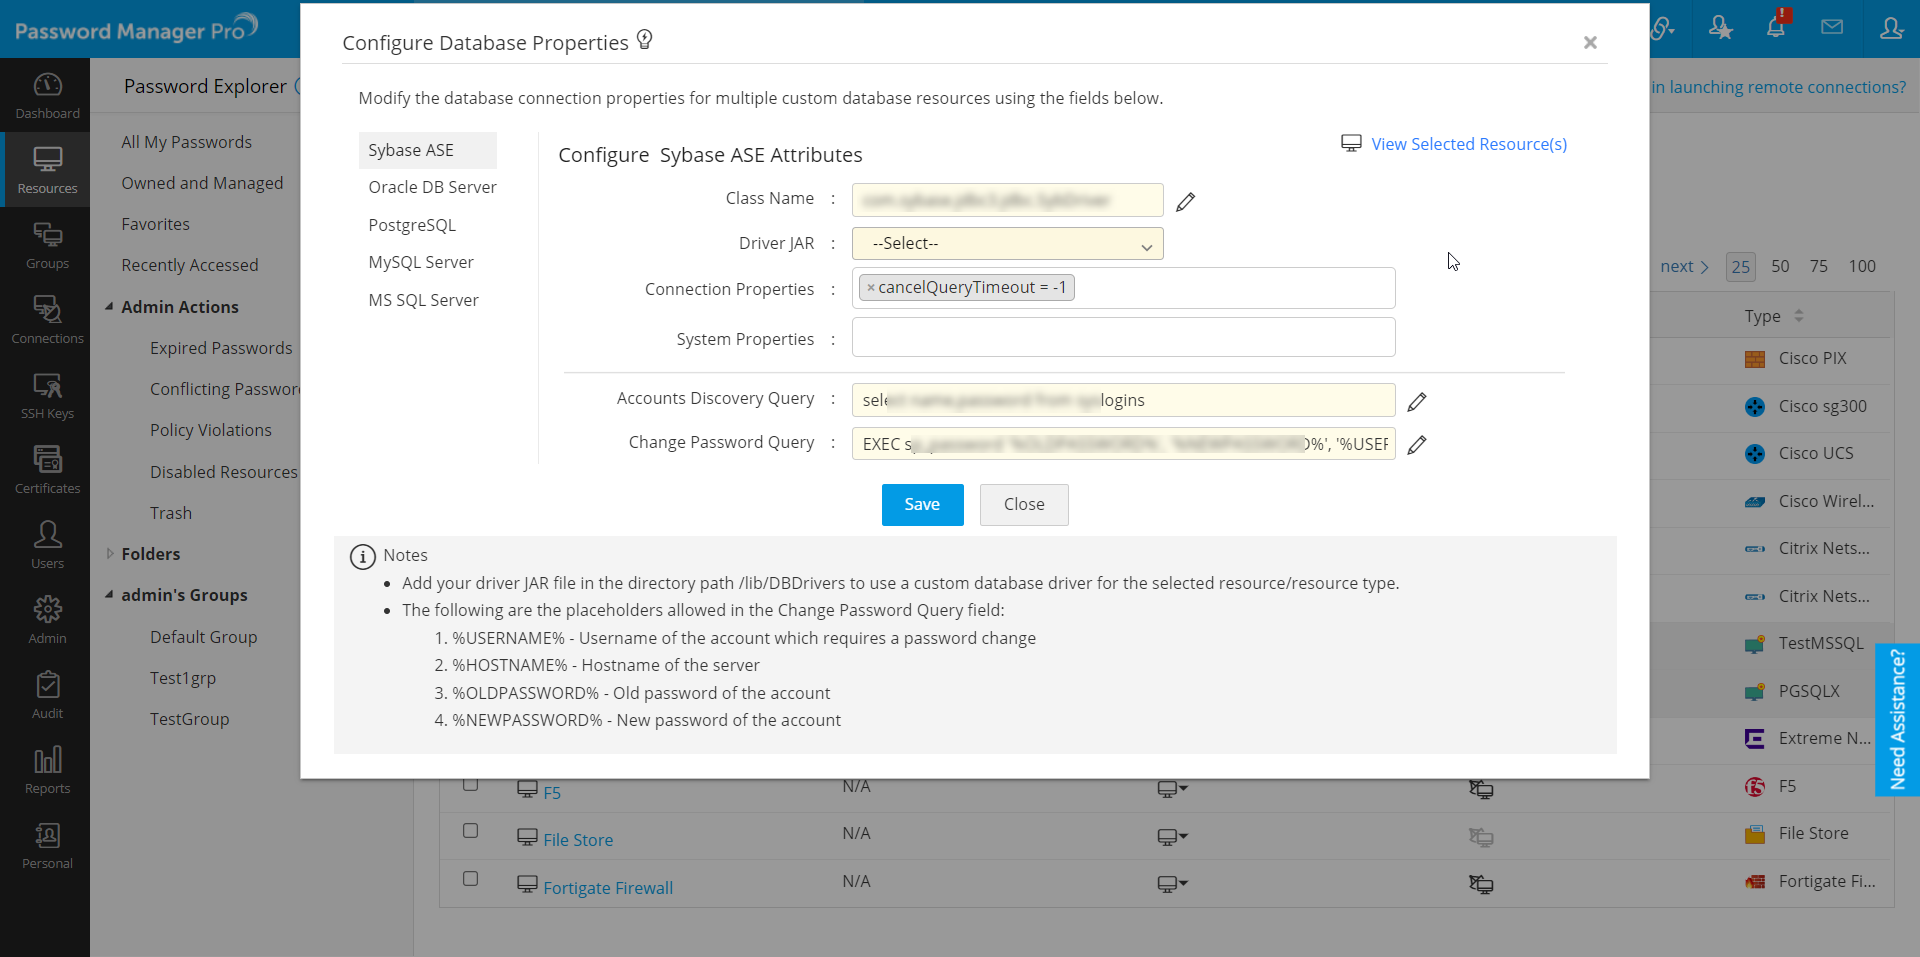
- To view the selected database resources click the View Selected Resource(s) link at the top-right corner.
- In the dialog box that opens, modify the relevant fields as required and click Save.
For example, you have established two new resource type categories, named AMP Database and KMP Database, each equipped with connection templates of MS SQL Server and PostgreSQL databases. Under each resource type category, three database resources have been added. Now, if you need to make bulk modifications to the connection properties of the three resources under the AMP Database resource type and the system properties of the three resources under the KMP Database resource type, follow these steps:
- Choose the resources requiring bulk modifications.
- In the dialogue box that appears, modify the connection properties under the MS SQL Server section.
- Next, navigate to the PostgreSQL section and modify the system properties.
Note: This action will alter the connection properties for all resources created using the new resource type with MS SQL Server template among the selected ones.
Note: This will alter the system properties for all resources created using the new resource type with the PostgreSQL template among the selected ones.
If you have selected resources from default resource types along with those from customized database resource types, only the attributes for resources from customized types will be altered, leaving the default resource types unchanged.